Sound Design with SuperCollider
In the past, I did a 15-minute introduction for SuperCollider (SC) for students at my University. Likewise to Sonic Pi’s introduction, I will repeat everything I talked about and give some additional insights.
SC can be used in many very different ways, such as algorithmic composition, sound design, research, and more. In the following, I concentrate on sound design.
Note that there is a strong connection between Sonic Pi (SP) and SC since SP uses SC to generate sound, that is, SP is used to implement a rhythm, but the actual sound comes from Synths defined by SC or samples.
Therefore, SC and SP can go hand in hand.
I also want to stress that one can implement rhythm and play samples using SC, but a lot more code is required because SC is much more low-level, i.e., more control but less rapid development.
SuperCollider
I was motivated by my interest in education and first discovered Sonic Pi (SP).
In my opinion, it is a very powerful tool for educational purposes and live programming.
One can rapidly implement a beat or a rhythm and learn the basic concept of structured programming and threads.
Additional effects can be added to the pre-defined synths, and we can play around with different arguments but changing the sound by those techniques is still limited.
Overall, simplicity is achieved by a lack of control over the sound that is created.
This is not a criticism.
Sonic Pi (SP) is a fantastic project.
However, I wanted more power over what was happening, and since Sonic Pi (SP) was built on top of SuperCollider (SC), I looked into it. I most probably would not have got a grasp of it if I had not discovered the excellent tutorials of Eli Fieldsteel, an Assistant Professor of Composition-Theory and Director of the Experimental Music Studios at The University of Illinois. SuperCollider (SC) is a package of three components:
- scsynth: a real-time audio server, i.e., the part that plays the sound
- sclang: an interpreted programming language focused on sound. The user can control scsynth by sending messages (Open Sound Control) to the audio server.
- scide: an IDE for sclang with an integrated help system, analyzing tools, and a good documentation.
SuperCollider is written in C++ and was developed by James McCartney and was originally released in 1996. In 2002, he generously released it as free software under the GNU General Public License. It is now maintained and developed by an active community.
Sonic Pi (SP) and other tools for algorithmic composition only use the audio server scsynth and replace the other parts with their own programming language and development environment. Since SuperCollider is around for some time, it is a very rich environment and language. However, one can also observe some inconveniences and feel its age. Nevertheless, it follows interesting concepts that were new to me, and whenever we see new coding paradigms and concepts, we learn something.
Programming Sound
First, let’s observe how the IDE interacts with the interpreter.
To evaluate a line of code, we press shift + return, and to evaluate a code block, we press cmd + return on the Mac and ctrl + return on Windows and Linux.
10 + 3;                     // returns 13
4 + 5;                      // returns 9
Array.series(10, 0, 1);     // returns [0,1,2,3,4,5,6,7,8,9]
Warning: One hotkey is very, very important, that is, cmd + ..
It stops all sound.
SC will not protect you from creating a painful or very loud sound.
Where Sonic Pi (SP) is rather safe, even a small typo can lead to a horrible and even damaging experience in SC.
Therefore, I recommend using headphones, and before you listen to a new sound, put them off your head and make sure the sound will not blow you away!
Booting the Server
I have written a simple extension Utils which boots the server and initializes the windows, i.e., analyzing tools I often require.
The code can be found in Utils.
I call a class function to initialize everything I want:
Utils.initTools();
Note that as long as we do not have to communicate with the audio server, i.e., play sound, we don’t need to boot the server.
Variables and Scope
Here we encounter the first inconvenience.
In SC there are some special pre-defined variables.
Each single character variable is pre-defined and globally available.
If you come from a modern programming language, this is strange.
However, it is often useful for prototyping in SC.
A very special variable is s, because it holds a reference to the default local server.
Therefore, to start the audio server, we evaluate:
s.boot();
No one stops you from overwriting s, but I would not recommend it.
To define a code-block we use round brackets.
We can use x without defining it because it is already defined for us.
(
x = 10;
x;
)
Evaluating
variable = 10;
results in an error because variable is undefined.
The following works just fine.
var variable = 10;
variable;
Since x is a global variable we can use it everywhere.
Evaluating the line and the code block will return 13.
x = 10;
(
x = x + 3;
x;
)
but we can also define a local x:
x = 10;
(
var x = 0;
x = x + 3;
x;
)
Evaluating all these lines will return 3, but the global variable x is still 10.
The following lines cause an error
var variable = 10;
(
variable = variable + 3;
variable;
)
while the next lines work and return 13.
(
var variable = 10;
variable = variable + 3;
variable;
)
To define a new global variable, the variable name has to start with ~, for example,
(
~variable = 10;
(
~variable = ~variable + 3;
~variable;
)
)
returns 13.
Functions
To define a function, we encapsulate its content by curly brackets, and to execute it, we call value() on it:
(
var func = {
  var x = 10;
  x;
};
func.value();      // returns 10
)
Here we see another strange behavior: The last line of a function is its return value. I am not a fan of this shortcut and if you work with sclang you will encounter additional ones. It adds required knowledge to understand a program written in sclang and steepen the learning curve. After getting used to it, they speed up the coding a little bit.
Here is another example of a function with arguments:
(
var add = {
  arg a, b;
  a + b;
};
add.value(6,11) // returns 17
)
Like in Python, one can define a default value for each argument, and we can ignore the order if we add the names. Furthermore, there is another rather strange shortcut:
(
var add = {|a = 5, b|
  a + b;
};
add.value(b: 11) // returns 17
)
There are many other parts of the sclang, and if you want to get started, I encourage you to visit the tutorials of Eli Fieldsteel or look at the official documentation.
A First Sine Wave
Let us create the most simple sound possible: a sine wave.
First, we define a function that can be seen as a process called unit generator (UGen) that starts when we call play().
There are hundreds of different UGenss, they basically spit out real numbers over time.
For example SineOsc samples a sine wave.
~sine = {arg freq=200; SinOsc.ar(freq, mul: 0.2)};
~sineplay = ~sine.play();
)
By default, the sine wave oscillates between -1 and 1.
We define a frequency of 200 Hz that is 200 cycles per second and a multiple of 0.2 such that the amplitude stays between -0.2 and 0.2, which reduces the volume.
Note that the following two statements are equivalent:
SinOsc.ar(freq, mul: 0.2);
SinOsc.ar(freq) * 0.2
We can change all arguments we defined, for example,
~sineplay.set(\freq, 500);
sets the frequency to 500 cycles per second which increases the pitch.
Note that set() is not called on the function but on the return value of ~sine.play()!
In fact, play() is another shortcut to play sound, and behind the scene, it creates a new Synth which I will show in a moment.
play() is excellent to play around and finding a sound, but once you have an idea which direction you want to go, it is better to define a Synth.
To stop the process, i.e., the sine wave, we can call:
~sineplay.release();
Of course, you can also press cmd + ., but this will kill all sound not only this sine wave.
Combining Sine Waves
Let us define a slightly more complex sound generated by two sine waves:
~twosines = {arg freq1=200, freq2=200; 0.2 * SinOsc.ar(freq1) + 0.2 * SinOsc.ar(freq2)};
What do we expect to hear? Since we add two identical sine waves together, we should hear the same sound but twice as loud. But if we play the sound, it does not fulfill our expectations:
~twosines.play();
The reason is another inconvenience: sclang strictly evaluates everything from left to right.
For example, 3 + 5 * 3 returns 24 instead of 18.
Therefore, we have to use brackets.
A very useful tool is the build in plotting tool.
We can see the problem more clearly if we plot our function:
~twosines.plot();
To achieve the desired result, we have to correct the code.
~sinesplay = {arg freq1=200, freq2=200; (0.2 * SinOsc.ar(freq1)) + (0.2 * SinOsc.ar(freq:freq2))}.play()
or
~sinesplay = {arg freq1=200, freq2=200; SinOsc.ar(freq1, mul:0.2) + SinOsc.ar(freq:freq2, mul:0.2)}.play()
A Wobbling Sound
Ok, this is rather boring.
However, if we change freq2 such that it is not equal but close to freq1, we get some interesting effect.
You may want to think about what sound you will hear if you do the following:
~sineplay.set(\freq2, 201)
We hear a kind of wobble effect.
Why?
Well, two sine waves can add up, but they also can cancel each other out.
For example, if we add two sine waves but with phase 0 and pi, we hear nothing.
This effect is used for noise cancelation in modern headphones.
Apart from some numerical errors, plotting the result reveals the cancelation:
{arg freq1=200, freq2=200; (0.2 * SinOsc.ar(freq1)) + (0.2 * SinOsc.ar(freq:freq2,phase:pi))}.plot()
Now back to the wobble effect.
Since freq2 is 1 Hz higher than freq1, the second sine wave does one extra cycle for each second.
Therefore, in that time span, the two waves interact between adding up and cancel each other out.
I encourage you to play around.
What will happen if freq2 is 5 Hz higher?
How does this affect the result?
Definition of a Synth
Here, I will not go into details because the documentation does a better job than I could ever accomplish.
In the following code snippet, I define a Synth.
The first argument of the method used to define the Synth is its name.
The second one is its content.
I call add() to add the Synth to the audio server.
You could also call store(), which additionally stores the Synth in a file.
In this way, you can use the Synth by loading it from a file and with some extra work, we can use the Synth by
other tools like Sonic Pi!!!
(
SynthDef.new(\sinewaves, {
  arg freq1=200, freq2=205, amp = 0.4, out = 0;
  var sig;
  sig = amp * 0.5 * SinOsc.ar(freq1);
  sig = sig + (amp * 0.5 * SinOsc.ar(freq:freq2));
  Out.ar(out, sig!2);
}).add();
)
So far, the sound does only come out of one speaker. The line
Out.ar(out, sig!2);
copies the sound and sends it to both speakers.
sig!2 is another handy shortcut for sig.dup(2).
Note that there is no re-evaluation happening, it just copies the result, but we can copy a function!
For example:
5!8             // returns [5, 5, 5, 5, 5, 5, 5, 5]
[1,2,3,4]!3     // returns [[1,2,3,4], [1,2,3,4], [1,2,3,4]]
rrand(0,10)!3   // returns an array containing three equal elements!
{rrand(0,10)}!3 // returns an array containing three possible different elements!
After we defined the Synth using SynthDef, we can create it, which will immediately start the sound.
We can change all arguments during the Synth lifetime.
~sinewaves = Synth(\sinewaves);
~sinewaves.set(\freq1, 100);
~sinewaves.set(\amp, 0.2);
Envelopes (Finite UGens)
So far, we had to start and stop the sound by hand. However, if we want to design a musical instrument, we want to manipulate the amplitude over time. Imagine a piano: if we hit a key, the sound requires some time to reach its maximum amplitude. This period is called attacktime. After the maximum is reached, it decreases, and if the pianist releases the key, the sound vanishes completely. There are infinite possibilities. For example, sometimes we want a sustaining sound, i.e., the amplitude stays constant for some period.
Instead of manipulation, musicians use the term modulation.
In general, achieving more interesting sounds through modulation of different arguments is a good practice.
In the following, I define an envelope (which I think of as a finite UGen).
{EnvGen.kr(Env.new(levels: [0, 1, 0.4, 0], times: [0.1,0.4,0.1], curve: [2,0,-3]))}.plot(0.6);
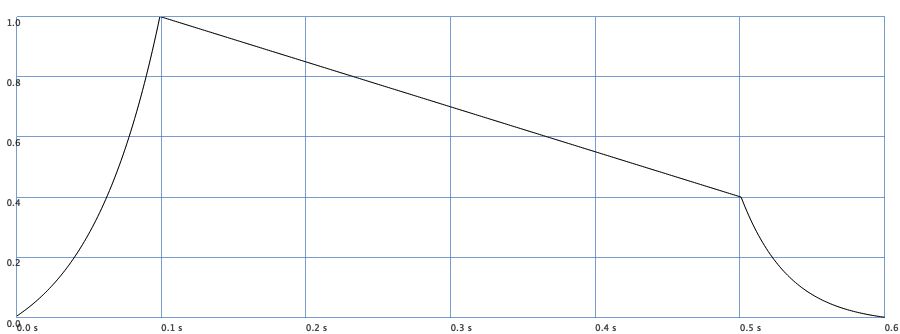
The envelope starts at 0, increases to 1 during 0.1 seconds, drops to 0.4 in 0.4 seconds, and then drops to 0 in 0.1 seconds.
The curve argument influences curvature of the segments.
It can be best understood by plotting the result while playing around with the values.
By multiplying the signal of the envelope to our sound signal, we get a sound that stops after 0.6 seconds.
(
SynthDef.new(\sinewaves, {
  arg freq1=200, freq2=205, amp = 0.4, out = 0;
  var sig, env;
  // doneAction: 2 removes the Synth from the server/memory if it is done!
  env = EnvGen.kr(Env.new(levels: [0, 1, 0.4, 0], times: [0.01,0.2,0.1], curve: [2,0,-3]), doneAction: Done.freeSelf);
  sig = amp * 0.5 * SinOsc.ar(freq1);
  sig = sig + (amp * 0.5 * SinOsc.ar(freq:freq2));
  sig = sig * env;
  Out.ar(out, sig!2);
}).add();
)

~sinewaves = Synth(\sinewaves);
Let’s plot the sound with and without being multiplied by the envelope:
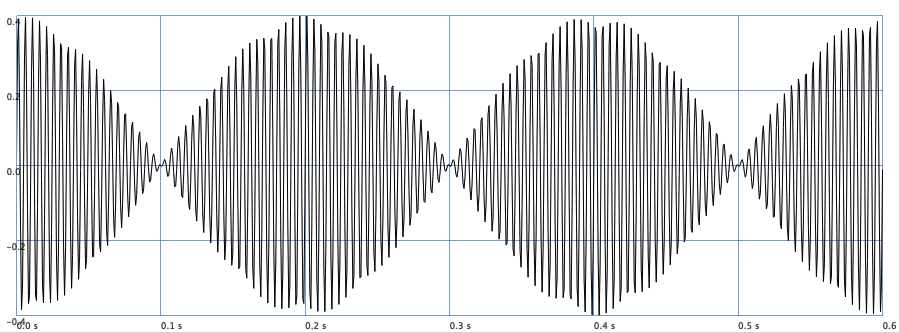
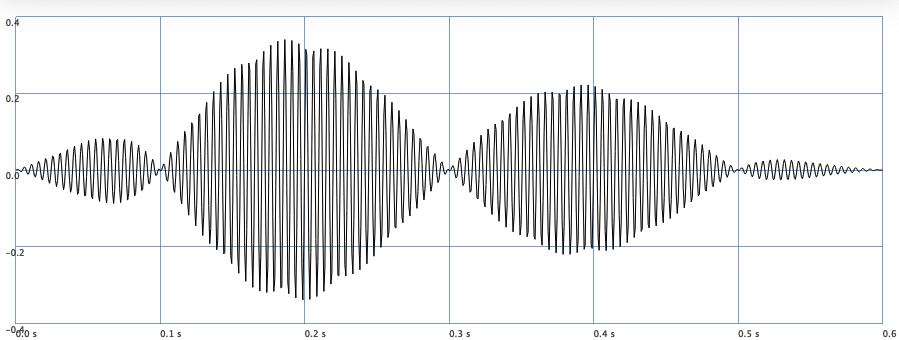
The following code generates the plot.
(
{
  var sig, env, freq1=200, freq2=205, amp = 0.4;
  env = {EnvGen.kr(Env.new(levels:[0, 1, 0.4, 0], times:[0.1,0.4,0.1], curve:[2,0,-3]))};

  sig = amp * 0.5 * SinOsc.ar(freq1);
  sig = sig + (amp * 0.5 * SinOsc.ar(freq:freq2));
  sig = sig * env;
  sig;
}.plot(0.6)
)
Explore New Sounds
To get a feeling for how a sound changes using different arguments, I recommend using play() in combination with MouseX and MouseY.
The latter two UGens spit out values that depend on the position of your mouse cursor.
Therefore, you can easily change two independent arguments at the same time.
{ SinOsc.ar(MouseX.kr(10, 500))!2 * 0.5 }.play()

{ LPF.ar(in: Saw.ar(MouseX.kr(10, 500))!2 * 0.2, freq: MouseY.kr(0, 5000)) }.play()

{ LPF.ar(in: WhiteNoise.ar(mul: 0.2), freq: MouseX.kr(0, 500)) }.play()

{ LPF.ar(in: WhiteNoise.ar(mul: 0.4), freq: 1000) * EnvGen.ar(Env.perc(0.1, 0.7)) }.play()

{ EnvGen.ar(Env.perc(0.1, 0.7)) }.plot(0.8);

{ SinOsc.ar(100, mul: 0.2) + LPF.ar(in: WhiteNoise.ar(mul: 0.4), freq: 1000) * EnvGen.ar(Env.perc(0.1, 0.7)) }.play();
Composing
Composing a whole piece takes time.
One way is first to design your Synths or find proper samples.
Then we need a rhythm and/or melody.
For that purpose, we use some other tools, or we use sclang.
If you want to use sclang a good starting point is to look into the concept of pattern especially PBind.
To get a better feeling of what is possible, copy the following code and execute it in the IDE. The piece was composed by Eli Fieldsteel and makes use of wavetable synthesis.